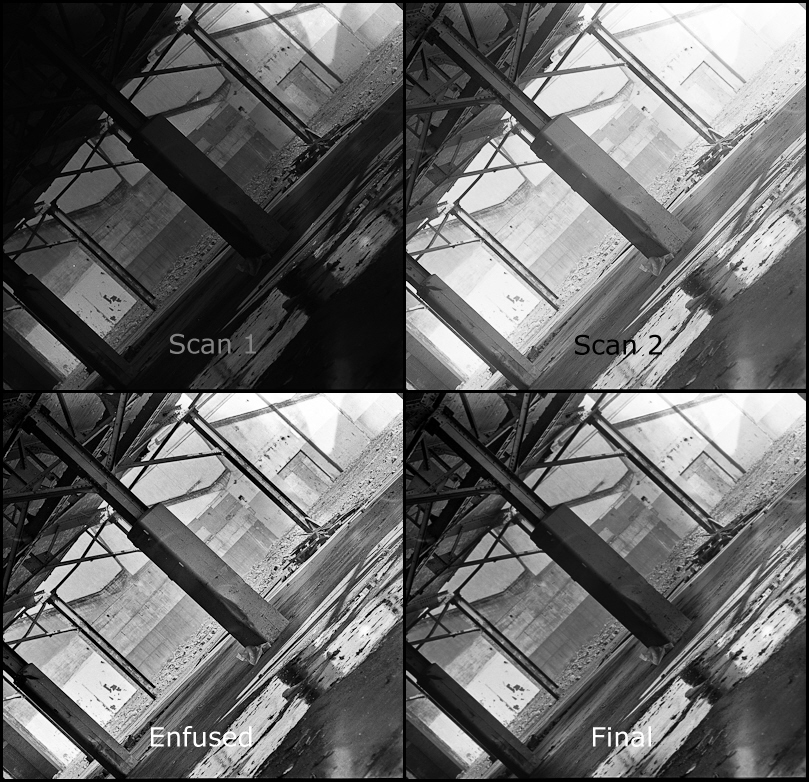
Example of a technique for scanning high dynamic range films. Plus a digital darkroom dodge and burn
I took this shot using my mamiya c220 with a 180mm lens. Film was TMAX 400 shot at 1/2 stop faster. As usual I screwed up the loading of the film into the developing spools so there are a few handling flaws.
- Developed for 12 minutes in 1:3 diluted D76.
- Scan 1 scanned to make sure highlight detail was retained
- Scan 2 was for shadow details both scans were 16 bit tiffs
- Used a program called enfuse and enfuse GUI to automatically blend both scans together. Enfuse by passes the HDR step going directly to the tone mapping but with more subtlety, less noise and artifacts.
It's hard to tell in small sized but the enfused image has rather harsh contrast in the area of the gravel.
Final step I blended Scan 1 and the enfused image together using a hand painted selective mask. With a bit more care I could tailor multiple selection masks to get the result exactly how I like it.
History of 158 Sterling Rd
Another Example using HDR Tools
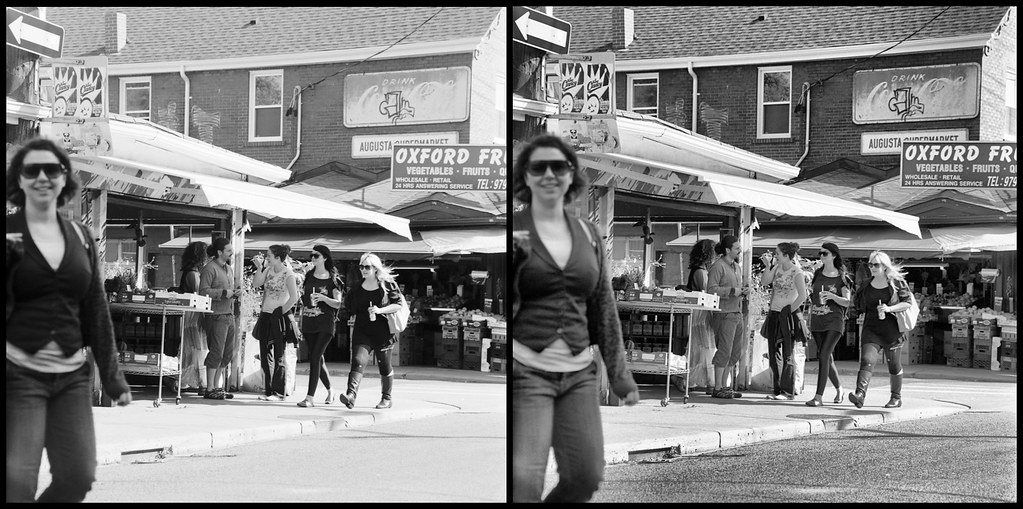
Image on the left is 14 bit scanned with some brightness curve adjustments in Lightroom. Normally I would do some dodge and burn.
The image on the right is the same scan plus an additional 2 scans at different scanner exposure levels. The 3 scans were combined and then tone mapped using HDR (high dynamic range) software.
I used Fuji Neopan ISO 400 film if I had used ISO 100 film the dynamic range could have been increased significantly. I think this does demonstrate how much information is contained within a film negative. Scanners have both a programmable offset and gain so there is actually more information extracted from the negative when you scan 3 times rather then manipulate a single scan.
As tone mapping increases local contrast at the expense of flattening out the overall image blending together portions of both images might result in the best of both worlds and focus the composition a bit more. Actually took the HDR into Lightroom to adjust curves and the results are better then above.
There is a trick (an extra 2 steps) to do the same thing in colour without destroying the colours I'm not sure it's worth the trouble but ask me if you are interested.
Tuesday, May 12, 2009
Thursday, May 07, 2009
Testing Epson V500 Scan of a 35mm Zeiss Contax IIIa Colour Negative
Unlike my Canon 4400f the Epson V500 scanner is in focus, also the slide holder are much better and easier to use. It also works on medium format. The new scanner will allow me to do more B&W in the future. This shot is nothing special but the I choose it as it needed a lot of dodging and burning
Notice the camera information in the additional information.
Yes the v500 is excellent price performance wise. Unfortunately the scanner software does not provide exif information. Unfortunately the program I use to add EXIF information is no longer available.
I did a test of my v500 on a resolution target and found the focus was good for about 800 lines per inch from 0 to .5mm plus the film thickness from the surface of the glass, going from 2400 to 4800 dpi only made a minor improvement differences, kind of explains why you have to go to medium format to get a worth while size print. Also explains why a special film holder is not going to buy you much except with curly negatives considering the v500 optics and it's LED illumination. Other have measured the V500 resolution as less than 1600 dpi but there is still merit to over sampling.
This confirmed the results of wet scanning with the film right against the glass
My Current Work Flow
- Clean everything with antistatic cloth
- Set scanner to pro mode, 3600 DPI for 35mm and 2400 DPI for MF in 48 bit tiff output.
- Insert negatives If they are too curly use anti-glare glass instead of plastic holders.
- Blow any dust off with a rocket blower (If you are rich use canned air).
- Preview
- Select all negatives and turn off sharpening and hit auto curve button to see what the epson software things it should look like
- For each negative adjust curve so there is no clipping using the droppers to set white and black and gamma and colour balance. The epson software is so primitive here, that my main concern that there is no highlight clipping or shadow blocking. Do this for each colour as the over all may look good but one channel might not. The point here is not to get a perfect scan but to get all the information out of the negative.
- Scan
- Optional If you need more shadow or highlight details then do an additional scan to expand the contrast in the highlight or dark areas blend the images back together in post. I don't have to do this very often. In post I use Lightroom to correct the image and remove any dust.
epson 1.png
epson 2.png
Important because you have turned sharpening off you need 2 levels of sharpening one for the scan and one just before final output. Fortunately lightroom has pretty good control here. The first level of sharpening is important and should be matched to the grain size and the scanning DPI it is not there to sharpen edges.
For difficult colour balance cases check out this note of mine.
For scanning cross processed films
For scanning high dynamic range (mostly B&W) go New, here, here and maybe here.
For curly negatives the Lomography Digtaliza works well see the bottom of my blog entry
A Two-Pass Approach to Sharpening
This is a good reference on resolution and scanning:
Subscribe to:
Posts (Atom)