 |
| Roll Over The Image With Your Mouse To See The Original |
You spend your hard earned money to pay for a trip to a far away place where no one really knows English just to wait in line to buy a ticket and when you finally get in you find that famous painting you heard so much about is faded, dull and chipped, it looks terrible by today's digital standards.
Fear not as today I will teach you the secrets of restoring these old "masterpieces" from dull and lack luster to the way they should have been in the first place that is if the painter had had any proper art school training.
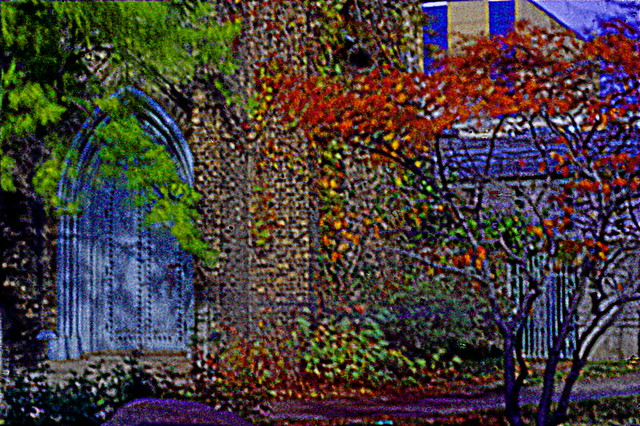
As an example I will use the painting the
Last Supper done by a moderately successful painter (I forget his name at the moment):
Clearly in those days they never heard of the
rule of thirds. At first I wanted to crop the image to make the subject Jesus conform to the rule of thirds. But then I realized I could not do a very nice roll over if the before and after images were of different sizes, besides cloning out the odd arms would be far too much work. So instead I opted to use selected focus. Using selected focus allows me to draw the viewer's eyes directly to the subject clearing up all those busy distractions that make the eye wander about. What was the artist thinking wasting his time on all those unnecessary details?
Selective focus also gives the painting a depth of field and 3 dimensionality that the original lacked.
To increase the feeling of magic and fantasy and to repair the chipped paint I applied an
Orton Effect filter/action. The Orton filter I applied came with a set of 10 other actions which I purchased from WeripUoff at only $180. I highly recommend them as they save you a lot of time learning stuff.
Then to give it a more modern update look I applied a
cross processing action (good value at only $80 from WeripUoff). Noticed the richness of colour. The hills in the background window are now a pleasant shade of Irish green.
Still it didn't quite pop so for the final touch I applied a subtle single image auto HDR
tone mapping, notice how much better the light is on Jesus' robes when compared to the original. A bit expensive at $260 for the HDR package from WeripUoff but how can you be
state of the art without the latest and best tools. Also consider the money you are saving and the disappointment you are avoiding by not travelling to view the original artwork.
Well priced alternative to a flatbed scanner.7200 dpi scanner (when measured with a target it turns out to be 3800 dpi in both directions which is right in Nikon cool scan territory)
Actual Dmax > 3.6 and can be increased through multiple exposure mode.
The Negative:
Scanning is done through the included Silverfast Se plus software.
Manual feeder so after you load the carrier you have to push it through by hand one frame at a time. This is not really a problem as I hand correct every negative
No digital ICE (not really a problem for me as I don't use it anyway and it doesn't work on B&W)
My Findings:
If you have any form of workflow the Silverfast software is a piece of junk you would have to spend at least the cost of a scanner to upgrade to a usable version. Besides a rather useless raw mode it doesn't have 48 bit per colour save function. The raw mode would be good if it integrated with lets say Lightroom but it doesn't. It's designed to work with another pricey piece of software you have to buy from them. I don't know about you but I only like to scan once and use the file as a master.
To top it off they keep on telling you to read a 500 page manual and strongly implying that if you want to be a pro you are using the wrong scanner software.
The solution is easy buy reasonably priced Vuescan software. The pro has lifetime support, useful raw workflow and can support multiple scanner types.
Scanning B&W I used some nice grainy HP5+ and found out this:
Multi-exposure is effectively a two pass scan with each scan taken at a different exposure, the 2 passes are then blended together. This actually works and extends the dmax and dynamic range for difficult frames. There is a slight but noticeable lose of resolution. most of which can be recovered with some of the hated USM filtering. Not much need for this function with HP5 I will have to wait until I test it on some high dynamic range shot using TMAX film.
The raw scans pre-adjusted with a film profile seem to contain all the tone information with no banding or noise. Thus they can act as masters.
For 3600dpi scans there was marginally better detail and micro-contrast when scanning at 7200dpi at letting Vuescan reduce the output to 3600dpi (down sampling). This seems to be real not some USM shapening slight of hand (USM was off). Makes sense as the measured on a target dpi is 3800dpi and downsizing by 2 is equivalent to multiple sampling without the alignment problems.
As scan time is almost 4 times as long at 7200dpi I will use 3600dpi scans on images that I don't care so much about and 7200dpi down sampled to 3600dpi on images that look interesting.
Also of slight interest was that letting the software convert from the colour scan to BW gave slightly better micro-contrast then converting the 48bit colour to 16 bit B&W after the fact or scanning in 16bit B&W.
I tested the same negative on my Epson V500. The Epson had less then half the actual resolution and more compression in the grey scale. The hp5 film grains were blobs instead of salt and pepper with the Plustek.