Using The V500 Scanner and HDR Techniques To Get The Most Out Of The Negative
Example of a technique for scanning high dynamic range films. Plus a digital darkroom dodge and burn

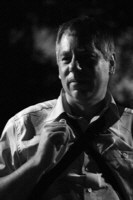
I took this shot using my mamiya c220 with a 180mm lens. Film was TMAX 400 shot at 1/2 stop faster. As usual I screwed up the loading of the film into the developing spools so there are a few handling flaws.
- Developed for 12 minutes in 1:3 diluted D76.
- Scan 1 scanned to make sure highlight detail was retained
- Scan 2 was for shadow details both scans were 16 bit tiffs
- Used a program called enfuse and enfuse GUI to automatically blend both scans together. Enfuse by passes the HDR step going directly to the tone mapping but with more subtlety, less noise and artifacts.
It's hard to tell in small sized but the enfused image has rather harsh contrast in the area of the gravel.
Final step I blended Scan 1 and the enfused image together using a hand painted selective mask. With a bit more care I could tailor multiple selection masks to get the result exactly how I like it.
History of 158 Sterling Rd
Another Example using HDR Tools

Image on the left is 14 bit scanned with some brightness curve adjustments in Lightroom. Normally I would do some dodge and burn.
The image on the right is the same scan plus an additional 2 scans at different scanner exposure levels. The 3 scans were combined and then tone mapped using HDR (high dynamic range) software.
I used Fuji Neopan ISO 400 film if I had used ISO 100 film the dynamic range could have been increased significantly. I think this does demonstrate how much information is contained within a film negative. Scanners have both a programmable offset and gain so there is actually more information extracted from the negative when you scan 3 times rather then manipulate a single scan.
As tone mapping increases local contrast at the expense of flattening out the overall image blending together portions of both images might result in the best of both worlds and focus the composition a bit more. Actually took the HDR into Lightroom to adjust curves and the results are better then above.
There is a trick (an extra 2 steps) to do the same thing in colour without destroying the colours I'm not sure it's worth the trouble but ask me if you are interested.
I took this shot using my mamiya c220 with a 180mm lens. Film was TMAX 400 shot at 1/2 stop faster. As usual I screwed up the loading of the film into the developing spools so there are a few handling flaws.
- Developed for 12 minutes in 1:3 diluted D76.
- Scan 1 scanned to make sure highlight detail was retained
- Scan 2 was for shadow details both scans were 16 bit tiffs
- Used a program called enfuse and enfuse GUI to automatically blend both scans together. Enfuse by passes the HDR step going directly to the tone mapping but with more subtlety, less noise and artifacts.
It's hard to tell in small sized but the enfused image has rather harsh contrast in the area of the gravel.
Final step I blended Scan 1 and the enfused image together using a hand painted selective mask. With a bit more care I could tailor multiple selection masks to get the result exactly how I like it.
History of 158 Sterling Rd
Another Example using HDR Tools
Image on the left is 14 bit scanned with some brightness curve adjustments in Lightroom. Normally I would do some dodge and burn.
The image on the right is the same scan plus an additional 2 scans at different scanner exposure levels. The 3 scans were combined and then tone mapped using HDR (high dynamic range) software.
I used Fuji Neopan ISO 400 film if I had used ISO 100 film the dynamic range could have been increased significantly. I think this does demonstrate how much information is contained within a film negative. Scanners have both a programmable offset and gain so there is actually more information extracted from the negative when you scan 3 times rather then manipulate a single scan.
As tone mapping increases local contrast at the expense of flattening out the overall image blending together portions of both images might result in the best of both worlds and focus the composition a bit more. Actually took the HDR into Lightroom to adjust curves and the results are better then above.
There is a trick (an extra 2 steps) to do the same thing in colour without destroying the colours I'm not sure it's worth the trouble but ask me if you are interested.
posted by Ryan at 8:53:00 AM
![]()
![]()


0 Comments:
Post a Comment
<< Home